Microgreens pack a mega punch
29 Mar 2019
Easy-to-grow microgreens are a flavorful, nutritious addition to any dish.
By Becca Blond Growing microgreens in your home is a hot DIY hobby these days. Who wouldn’t want a tasty, nutrient-rich food to add to meals simply by plucking it from a windowsill tray? From arugula and radishes to chives and mustard greens, tender vegetable shoots are easy to grow in small indoor spaces. They also take far less time from seed to harvest than traditional vegetables, with the average microgreen reaching a harvestable height of 2 inches or so after 14 growing days. As their moniker suggests, microgreens are just smaller versions of their full-sized herb and veggie siblings. But because these small greens grow so quickly and are harvested before maturity, they’re jam-packed with beneficial enzymes and provide a super-concentrated nutrient source that is environmentally friendly to grow, as micros require far less water and no fertilizer.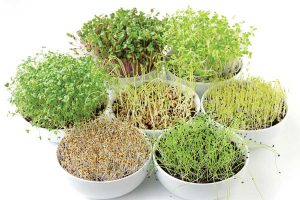

Prepare & Pair
You wouldn’t make a salad entirely of microgreens; you’d wipe out your entire crop in one bowl, and the flavor would be too intense. Instead, use microgreens as toppings. Salads, grilled fish and fresh burrata are just a few foods they’d enhance. In fact, these tasty greens would benefit most dishes. “Taste is in the mouth of the beholder,” muses Matuszak, who uses greens to add tang to meals. “I use a good deal of spicy mustards and radishes to give a dish a little pop. Remember, most restaurant dishes hardly use any microgreens at all, and if they do they’re usually just a garnish. But micros can add a complex flavor to any dish.” Depending on the variety, micros can add a mild, nutty or spicy flavor, as well as crunch, color and fiber.
How to Grow Microgreens
You’ll need a lot of natural light or a small grow light, soil, a shallow tray, a water mister and seeds. You can also purchase microgreen growing kits online or at local gardening stores. Once you’ve gathered supplies, follow these instructions: ✤ Decide where to grow your greens. If you have a south-facing window that gets lots of sunlight, you may be able to get by without buying a grow light. If you use grow lights, set them on timers. ✤ Evenly spread about 1 inch of organic potting soil on the bottom of the tray. ✤ Scatter seeds over the top of the soil as evenly as possible. Since you’ll harvest the entire tray, you want as many seedlings to sprout as possible, so you’ll use more seeds than if you were trying to grow plants to maturity. You can soak the seeds overnight, which will speed up the amount of time it takes them to sprout, but it’ll be harder to evenly scatter the seeds when they’re wet. ✤ Once scattered, cover the seeds with a light layer of compost and mist the tray with filtered water. While seeds germinate, keep the soil moist by misting the tray a few times a day. ✤ Most microgreens only produce one crop per grow (pea shoots might regrow if you leave a leaf on the cut stem). After harvesting, remove the roots from the soil or compost the soil and begin anew. ✤ Microgreens usually mature in two to four weeks. When it’s time to harvest, use scissors to cut the greens right above the soil level. ✤ Harvested microgreens should last a week refrigerated in an airtight container.—B.B.