Seed Success
06 Apr 2015
It’s easy to grow from seed if you follow these tips.
By Carol O’Meara Do seed packets on store shelves have you thinking about planting? Concerns over big agriculture, food safety and the environment, along with an interest in heirloom plants, are driving a robust seed industry. “More people are gardening, and there’s a resurgence toward home and local,” says Curtis Jones, co-owner of Botanical Interests in Broomfield (www.botanicalinterests.com). And starting seeds is “just cool; they want to germinate and grow,” says Becky Hansen, of BBB Seed in Boulder (www.bbbseed.com), which specializes in heirloom vegetables. “Plus, the available varieties are nearly endless. You can share them, trade them, talk about them and blog about them.”
If you’ve ever wondered how to grow plants from seed, here are tips to get you growing in the right direction. “A lot of things don’t transplant well, but do great when sown directly into the soil,” Jones says. These include beans, carrots and corn. “And don’t start root crops indoors,” he adds.
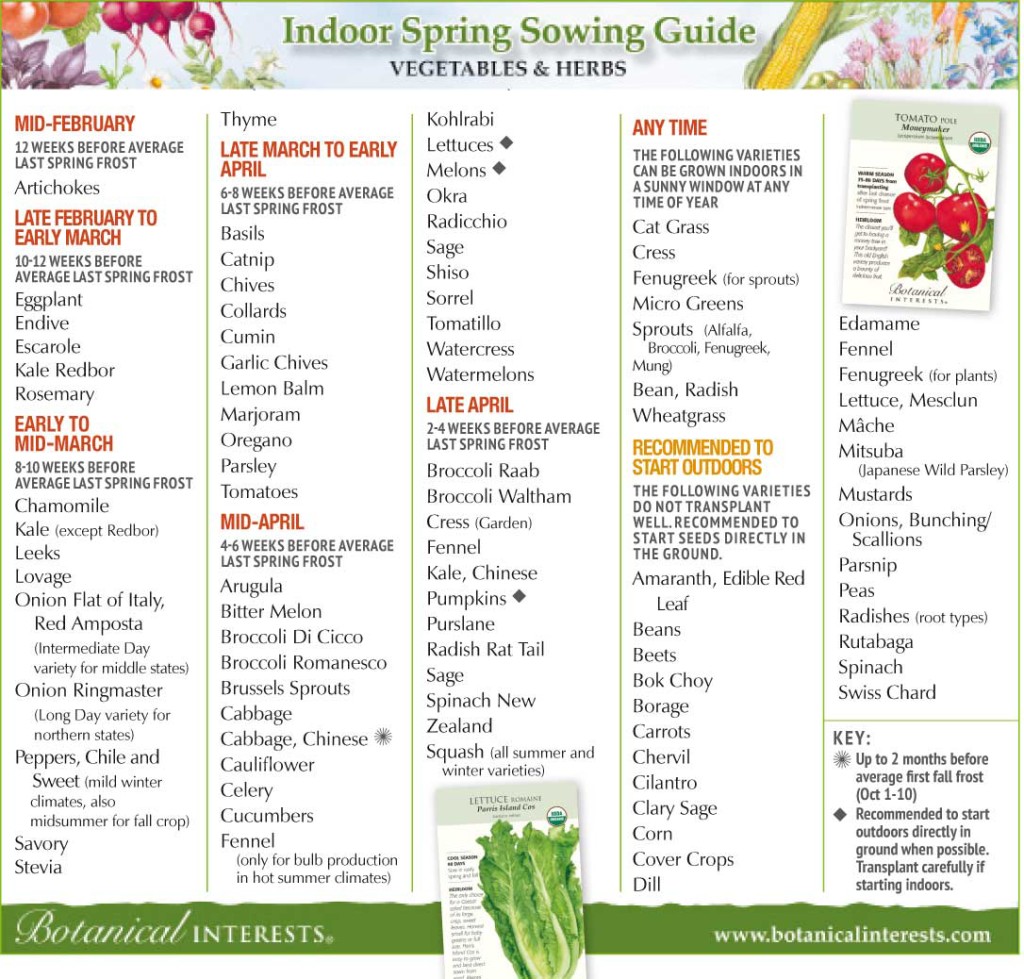
The time to start seeds depends on the last average frost date. “In Boulder County, that’s the first or second week in May,” Hansen says, so you’d typically start seeds indoors in early or mid-March. Dates for starting specific seeds vary from plant to plant, but this information is usually listed on the seed packet. (See Botanical Interests’ “Indoor Spring Sowing Guide” below for sowing times that correlate to our area.)
Grow plants from seeds that have longer maturity times; starting these indoors gives you a jump on the season and ensures you’ll get a harvest. Hansen says, “The plants to sow indoors are the ones that need a longer growing season than you have.” Tomatoes, peppers, tomatillos, pumpkins and winter squash are good candidates, although pumpkins and squash are fussy about transplanting and should be sown in biodegradable Jiffy pots so they can be planted without disturbing their roots.
And starting seeds is “just cool; they want to germinate and grow,” says Becky Hansen, of BBB Seed in Boulder (www.bbbseed.com), which specializes in heirloom vegetables. “Plus, the available varieties are nearly endless. You can share them, trade them, talk about them and blog about them.”
If you’ve ever wondered how to grow plants from seed, here are tips to get you growing in the right direction. “A lot of things don’t transplant well, but do great when sown directly into the soil,” Jones says. These include beans, carrots and corn. “And don’t start root crops indoors,” he adds.
The time to start seeds depends on the last average frost date. “In Boulder County, that’s the first or second week in May,” Hansen says, so you’d typically start seeds indoors in early or mid-March. Dates for starting specific seeds vary from plant to plant, but this information is usually listed on the seed packet. (See Botanical Interests’ “Indoor Spring Sowing Guide” below for sowing times that correlate to our area.)
Grow plants from seeds that have longer maturity times; starting these indoors gives you a jump on the season and ensures you’ll get a harvest. Hansen says, “The plants to sow indoors are the ones that need a longer growing season than you have.” Tomatoes, peppers, tomatillos, pumpkins and winter squash are good candidates, although pumpkins and squash are fussy about transplanting and should be sown in biodegradable Jiffy pots so they can be planted without disturbing their roots.
Snug & Cozy
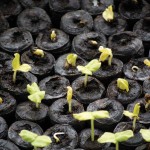
To germinate, seeds need humidity and warmth. Tent the tray or pots with plastic to increase humidity during germination, or set seed trays on an electric heat mat. You can also line seed trays with moist gravel to increase the humidity. Keep the room at 65 to 72 degrees. Most seeds don’t need light to germinate. But lights are critical once sprouts barely poke through the seed-starting medium (a soilless mixture of peat, vermiculite or perlite with compost). Grow lights, or a combination of cool and warm fluorescent tubes that provide blue and red spectrums, respectively, work well (see “Right Light” below). You’ll need chains or ropes to raise the lights as the plants grow. Hang the lights directly over the seed trays, making sure they can be easily raised to stay 3 to 4 inches above vegetable seedlings at all times. Seedlings need 12 to 16 hours of light each day, and a timer best ensures that. Long, spindly, weak stems indicate the lights are too far away. Water seedlings by adding liquid to the seed trays instead of directly to the plants. This allows water to be wicked up into the tray cells or pots. If this isn’t possible, gently water seedlings at the surface with a hand-held sprayer or mister. Keep seedlings evenly watered but never soaked. Overwatering causes root rot and encourages damping-off fungus, resulting in pinched stems and death.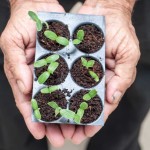 If more than one seed in a cell or pot germinates, select the strongest seedling and pinch off the others. Don’t pull competing seedlings from a pot; this disturbs the tender root system of the new seedling. A small fan circulating air gently across the tray promotes strong stems able to withstand wind. “Always try to replicate conditions outside,” Hansen suggests.
The cotyledons are a seedling’s first pair of leaves and a food source for the emerging seedling. The true leaves develop from the stem directly above the cotyledons. Once the seedlings have two sets of true leaves, transplant them into the next-size-larger pot. Lift seedlings by the leaves, not the tender stem, and use a popsicle stick or plant tag to lift out the intact roots. If using Jiffy pellets or pots, just put the pellet or pot into the next-size container after the roots start to poke through the sides.
After transplanting, don’t fertilize until the roots touch the sides of the containers, usually about a week later. Then fertilize at half-strength once weekly using an organic liquid fertilizer. Potting up may need to occur several times as the plants grow, until outside conditions are optimal for planting outdoors. Use a standard potting medium for potting up; there’s no need to continue with seed-starting soil once seedlings are established.
If more than one seed in a cell or pot germinates, select the strongest seedling and pinch off the others. Don’t pull competing seedlings from a pot; this disturbs the tender root system of the new seedling. A small fan circulating air gently across the tray promotes strong stems able to withstand wind. “Always try to replicate conditions outside,” Hansen suggests.
The cotyledons are a seedling’s first pair of leaves and a food source for the emerging seedling. The true leaves develop from the stem directly above the cotyledons. Once the seedlings have two sets of true leaves, transplant them into the next-size-larger pot. Lift seedlings by the leaves, not the tender stem, and use a popsicle stick or plant tag to lift out the intact roots. If using Jiffy pellets or pots, just put the pellet or pot into the next-size container after the roots start to poke through the sides.
After transplanting, don’t fertilize until the roots touch the sides of the containers, usually about a week later. Then fertilize at half-strength once weekly using an organic liquid fertilizer. Potting up may need to occur several times as the plants grow, until outside conditions are optimal for planting outdoors. Use a standard potting medium for potting up; there’s no need to continue with seed-starting soil once seedlings are established.
Time to Acclimate
After the last frost date and when soil temperatures warm to ideal for plants, it’s time to harden off the seedlings by gradually exposing them to outside temperatures, sun and wind. Start one week before planting by placing the plants outside during the warm part of the day in a sunny but sheltered location. Bring them back inside after one to two hours. The next day, increase the length of time to five hours. On day three, expose plants to direct morning sunlight and place them in shade in the afternoon. Increase sun exposure to plants over the remaining days until they can withstand the normal amount of sun exposure for that particular plant. During the last two days of hardening off, if nighttime temperatures are normal, let the plants stay outside overnight. Now your plants are ready for the garden. Carol O’Meara is a local gardening enthusiast and entomologist. Read her blog at gardeningafterfive.wordpress.com.Starting Seeds
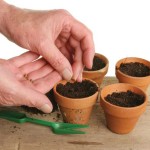
You don’t need a lot of equipment to grow seeds: shelf space, plastic seed trays to hold the pots, sterile seed-starting medium, seeds, labels and lights. Plastic trays with 1-inch square cells, plastic pots, Jiffy peat pellets in mesh netting or Jiffy peat pots are some of the preferred seed containers. “I like paper pots you make from newspapers,” says Becky Hansen of BBB Seed in Boulder. “They decompose quickly and you can plant them straight into the ground.”
Use only sterile containers with drainage holes and sterile seed-starting medium. Sterilize recycled plastic or ceramic pots in a 10-percent bleach solution prior to planting seeds, but rinse them thoroughly, as bleach is lethal to plants.
The ideal medium is a lightweight soilless mixture of peat, vermiculite or perlite with compost. Avoid using soil; it may contain disease organisms and it holds water for too long, promoting root rot.
Plastic trays with 1-inch square cells, plastic pots, Jiffy peat pellets in mesh netting or Jiffy peat pots are some of the preferred seed containers. “I like paper pots you make from newspapers,” says Becky Hansen of BBB Seed in Boulder. “They decompose quickly and you can plant them straight into the ground.”
Use only sterile containers with drainage holes and sterile seed-starting medium. Sterilize recycled plastic or ceramic pots in a 10-percent bleach solution prior to planting seeds, but rinse them thoroughly, as bleach is lethal to plants.
The ideal medium is a lightweight soilless mixture of peat, vermiculite or perlite with compost. Avoid using soil; it may contain disease organisms and it holds water for too long, promoting root rot.
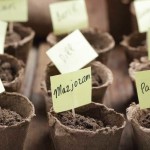 Label seedlings to avoid confusing the varieties. As growing plants move into larger pots or into the ground, transfer labels with them.
To plant, mix the soilless medium with water in a large bowl, getting the medium damp but not soaked.
Label seedlings to avoid confusing the varieties. As growing plants move into larger pots or into the ground, transfer labels with them.
To plant, mix the soilless medium with water in a large bowl, getting the medium damp but not soaked.
 If using Jiffy pellets, soak them in water until the peat completely expands and the mesh fully opens. Fill tray cells or pots with damp medium, but don’t pack it down; you want the medium to be light and fluffy.
 Make a seed-sized hole in the medium to the depth listed on the seed packet. If no information is available, a good rule of thumb is to plant seeds to a depth equal to two to three times their diameter. Place seeds in the hole and gently cover them up without packing the medium, then lightly mist with water. If the medium is already relatively wet, no additional water is needed.
—C.O.
Make a seed-sized hole in the medium to the depth listed on the seed packet. If no information is available, a good rule of thumb is to plant seeds to a depth equal to two to three times their diameter. Place seeds in the hole and gently cover them up without packing the medium, then lightly mist with water. If the medium is already relatively wet, no additional water is needed.
—C.O.
Right Light
Although vegetable seeds can germinate in the dark, they require light upon sprouting. Most home gardeners use south-facing windows, lights, or a combination of the two to avoid leggy, pale seedlings, which indicate light deficiency.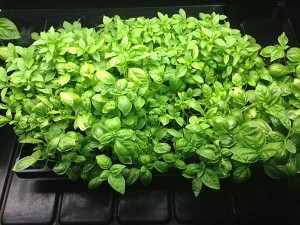 Vegetable seedlings need 12 to 16 hours of light per day, which can be provided in any combination of cool (blue spectrum) and warm (red spectrum) fluorescents, full-spectrum fluorescents and natural light. If lights supplement natural southern daylight, you may only need to turn them on for three to four hours at sunset.
Standard “shop lights” with inexpensive 40-watt fluorescent bulbs (also called T12 bulbs, with the T referring to the diameter of the tube) provide sufficient light for most seedlings. Serious gardeners might want to look into more expensive T8 or T5 bulbs, which are slimmer in diameter and more energy efficient than shop lights.
If you’re looking to offset your expenses, forgo expensive grow lights and instead mix one warm bulb and one cool bulb in each tube of a fluorescent fixture. -Regular fluorescent bulbs are usually cool, while bulbs marketed as “soft light” can be used for the warm bulb.
—Eli Wallace
Vegetable seedlings need 12 to 16 hours of light per day, which can be provided in any combination of cool (blue spectrum) and warm (red spectrum) fluorescents, full-spectrum fluorescents and natural light. If lights supplement natural southern daylight, you may only need to turn them on for three to four hours at sunset.
Standard “shop lights” with inexpensive 40-watt fluorescent bulbs (also called T12 bulbs, with the T referring to the diameter of the tube) provide sufficient light for most seedlings. Serious gardeners might want to look into more expensive T8 or T5 bulbs, which are slimmer in diameter and more energy efficient than shop lights.
If you’re looking to offset your expenses, forgo expensive grow lights and instead mix one warm bulb and one cool bulb in each tube of a fluorescent fixture. -Regular fluorescent bulbs are usually cool, while bulbs marketed as “soft light” can be used for the warm bulb.
—Eli Wallace