Can It! Step-by-Step Canning Guide
04 Sep 2008
Up to your elbows in garden tomatoes? Here’s a step-by-step guide for canning your harvest.
Hint: It’s easier than you think.
At harvest time, your garden’s bounty covers kitchen counters in fresh produce, warm from the sun and filled with flavor from all the TLC you’ve given it.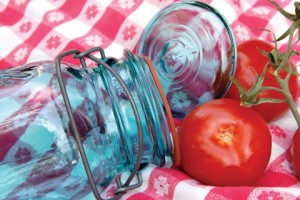 When it’s time to pluck the last fruits from the vine, why not preserve the pleasure of your freshly grown food through canning? In dark winter months, colorful jars of bright red tomatoes, crisp green string beans and cheerful yellow corn will light up the pantry as well as holiday meals.
Even if you don’t garden, you can buy flats of fruits and vegetables from a farmers’ market and can them for the winter. With today’s high food costs, you’ll save a few bucks and have fun, too, especially if you invite a few friends over for a canning party. It makes the time pass more quickly when you can chat and enjoy lunch while the food processes in the canner or pressure cooker.
Although canning is one of today’s lost arts, it’s actually simpler than it seems. Canned foods fall into two groups: acid and low acid, and the canning procedure differs for each type. Acid foods are generally fruits like peaches, pears, strawberries, plums and tomatoes. These foods all contain natural acids in varying amounts, depending on the variety. (If a recipe calls for vinegar to be added, consider the food to be acid.) Produce in the low-acid group is mostly vegetables, and any recipe that mixes together vegetables and fruits should be treated as low acid for processing.
When it’s time to pluck the last fruits from the vine, why not preserve the pleasure of your freshly grown food through canning? In dark winter months, colorful jars of bright red tomatoes, crisp green string beans and cheerful yellow corn will light up the pantry as well as holiday meals.
Even if you don’t garden, you can buy flats of fruits and vegetables from a farmers’ market and can them for the winter. With today’s high food costs, you’ll save a few bucks and have fun, too, especially if you invite a few friends over for a canning party. It makes the time pass more quickly when you can chat and enjoy lunch while the food processes in the canner or pressure cooker.
Although canning is one of today’s lost arts, it’s actually simpler than it seems. Canned foods fall into two groups: acid and low acid, and the canning procedure differs for each type. Acid foods are generally fruits like peaches, pears, strawberries, plums and tomatoes. These foods all contain natural acids in varying amounts, depending on the variety. (If a recipe calls for vinegar to be added, consider the food to be acid.) Produce in the low-acid group is mostly vegetables, and any recipe that mixes together vegetables and fruits should be treated as low acid for processing.
 Acid foods are canned in a water-bath canner, which involves boiling the filled jars in a large, deep, canning pot to kill molds and yeast. The acid in the foods keeps bacteria at bay.
Low-acid foods must be processed in a pressure cooker, as boiling alone is not enough to kill off organisms. A pressure cooker superheats the filled jars to 240˚ F to accomplish that.
Pressure-cooking is a more involved process, so this article focuses on water-bath canning, which is easier and less time-consuming, and works well for fruits. See the Water-Bath Canning Equipment list on the opposite page for the items you’ll need for canning. For the best flavor and nutritional value, eat canned foods within a year. Although they can last longer, canned foods lose texture and vitamins if they age more than one year.
Safety is the most important factor in canning. If you’re new to canning, contact the Colorado State University Extension office at 303-678-6238 for tips and information, along with steps to ensure that your canned food will be safe.
Acid foods are canned in a water-bath canner, which involves boiling the filled jars in a large, deep, canning pot to kill molds and yeast. The acid in the foods keeps bacteria at bay.
Low-acid foods must be processed in a pressure cooker, as boiling alone is not enough to kill off organisms. A pressure cooker superheats the filled jars to 240˚ F to accomplish that.
Pressure-cooking is a more involved process, so this article focuses on water-bath canning, which is easier and less time-consuming, and works well for fruits. See the Water-Bath Canning Equipment list on the opposite page for the items you’ll need for canning. For the best flavor and nutritional value, eat canned foods within a year. Although they can last longer, canned foods lose texture and vitamins if they age more than one year.
Safety is the most important factor in canning. If you’re new to canning, contact the Colorado State University Extension office at 303-678-6238 for tips and information, along with steps to ensure that your canned food will be safe.
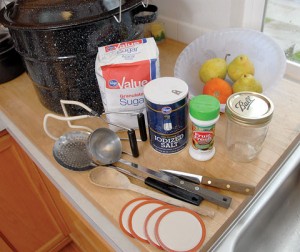
Water-Bath Canning Equipment
- 1 22-quart water-bath canner with a lid
- 1 metal-ring jar holder for loading the jars into the canner
- 7 glass pint canning jars free of cracks or nicks, with rings and lids
- 1 jar lifter
- Salt
- 1 jar of Fruit Fresh, citric acid or other fruit preserver
- 1 spatula or long-handled wooden or plastic spoon
- 1 funnel
- 1 ladle
- 1 large saucepan
- 1 small saucepan
- 1 pair of tongs
- 1 large bowl filled with ice water