How to make fresh, delicious dill pickles at home
13 Oct 2016
11 Steps to Perfect Pickles
Text and canning photos by Lisa Truesdale Poor Napoleon couldn’t find a suitable way to keep his massive armies properly fed while they were busy invading other countries. So in 1795, the French government offered a prize of 12,000 francs (about $2,000 in U.S. dollars back then) to anyone who could invent a better food-preservation method than drying, smoking or any of the other popular practices of the time. A man named Nicolas Appert claimed the prize 15 years later; it took him a while, but he’d finally perfected his method of heating, boiling and sealing food in airtight glass containers, similar to how we still do it today.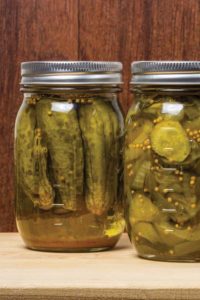
Canning Equipment Needed
* If you’re reusing jars, run your finger around the rim of each; jars with even small chips or cracks won’t seal well. If you’re reusing lids, make sure they’re not bent and that the rubber seal/gasket attached to the underside is still intact. If you’re reusing metal rings, discard any that are bent or dented, or even have one small spot of rust.
- 7 wide-mouth, quart-sized canning jars*
- 7 canning lids*
- 7 canning rings*
- Water-bath canner (about 20-quart capacity) with metal rack and lid; about $40-$50 new, or borrow one from a friend)
- Stockpot
- Small saucepan
- Jar Lifter (large metal tongs with rubber grips)
- Lid Lifter (simple plastic stick with magnet on the end)
Dill Pickle Recipe
 Here’s a recipe for dill pickles from Longmont resident Tracy Lolio. The amounts of dill, garlic and chile peppers can be adjusted to suit your taste, but “always measure the water and vinegar according to the recipe,” cautions Lolio.
INGREDIENTS (makes 7 quarts)
Here’s a recipe for dill pickles from Longmont resident Tracy Lolio. The amounts of dill, garlic and chile peppers can be adjusted to suit your taste, but “always measure the water and vinegar according to the recipe,” cautions Lolio.
INGREDIENTS (makes 7 quarts)
- 11-12 pounds pickling cucumbers*
- 4 cups white vinegar
- 2 cups apple cider vinegar
- 6 cups water
- 8 tablespoons canning/pickling salt (do not substitute table salt or kosher salt)
- 14 large grape leaves (2 per canning jar) (Lolio found hers in a neighbor’s yard, but they can also be purchased at specialty grocery stores)
- 14 cloves garlic, peeled (2 per jar, or more to taste)
- 14 dried red chile peppers (2 per jar, or more to taste)
- 21 heads of fresh dill (3 per jar; can substitute 1-2 tablespoons dill seed per jar or 2 tablespoons dill weed per jar)
- Pickle Crisp granules, optional (this is a formula that some people add to ensure crispness; available where canning supplies are sold)
11 Steps to Perfect Pickles
Step 1: Clean and Inspect
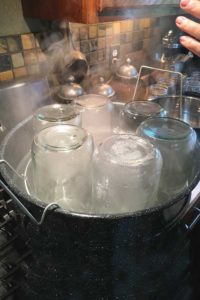 Sterilize canning jars by boiling them upside-down (without lids) in the water-bath canner for at least 10 minutes. “Do this even if you purchased them new,” Tracy Lolio advises. Set aside until cool enough to handle, but keep the water in the canner boiling, adding more if necessary to maintain the proper water level. Boil the lids and metal rings in a pan of water until you’re ready for them.
Step 2: Make Brine
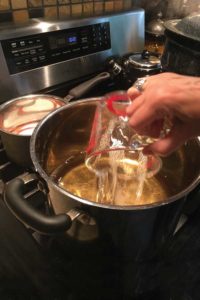 Combine vinegars, water and salt in a large stockpot. Boil about 10 minutes, until salt is completely dissolved. “After experimenting with different recipes for years, I decided I prefer recipes with equal parts vinegar(s) and water,” Lolio says. “Once you find a recipe you like, though, hang onto it!”
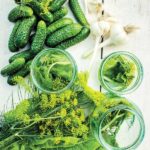
Step 3: Prepare Cucumbers
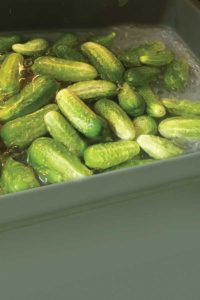 Thoroughly wash off mud or other debris. Don’t use any cucumbers with blemishes, as those could ruin the whole batch. To help preserve crispness, keep the cucumbers soaking in an ice bath until you’re ready for them.
Step 4: Cut Cucumbers
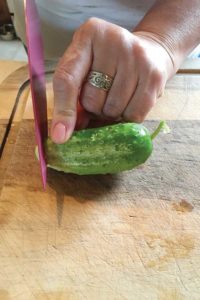 First cut about ¼ inch off the blossom end (the end opposite the stem) of each; this helps maintain crispness. Pluck off (but don’t cut) stems, if there are any. Cut cucumbers as desired—spears, round slices, long slices for sandwiches, chunks or halves—or keep them whole. The less you cut, the crisper the pickles will be. Whole pickles will be crisper than small slices, but you won’t be able to fit as many in each jar. You can mix sizes in each jar; Lolio used spears but kept some smaller cucumbers whole for packing at the top.
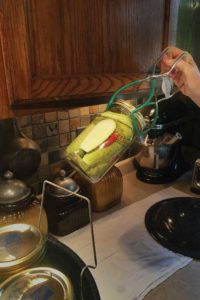
Step 5: Pack Jars
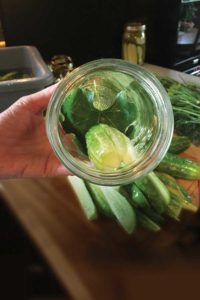 Place two grape leaves at the bottom of each jar. (According to the National Center for Home Food Preservation, there’s a substance in grape leaves that inhibits the enzymes that can make the pickles soft; however, cutting off the blossom end of each cucumber serves the same purpose.) Fill the jar with cucumbers. If you’re using wholes, halves or spears, insert the fatter end of each piece first.
Step 6: Add Flavors
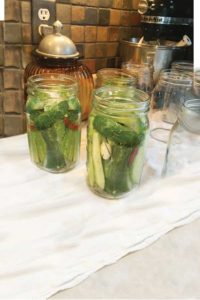 When there’s still a few inches left at the top, put the dill, garlic cloves and chile peppers around the sides. (Lolio uses a clean chopstick to push the dill down into place.) Then pack smaller cucumbers in at the top. Pack as tightly as possible to avoid air pockets; unfilled jars could cause the cucumbers to rise to the top above the brine. If desired, add Pickle Crisp granules according to package directions.
Step 7: Add Brine
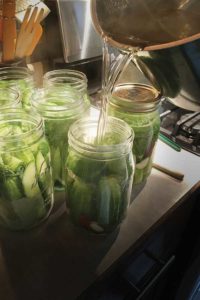 Pour brine into each jar, leaving about ½ inch of space at the top. “Use a clean cloth to dry the rim of each jar,” Lolio says, “because they won’t seal well if there are any drops of moisture.”
Step 8: Cover Jars
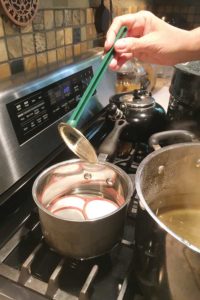 Use the Lid Lifter to remove the lids and rings from the boiling water. Put one lid on each jar, gasket-side down. Finish each with a metal ring and screw on tightly.
Step 9: Boil Jars
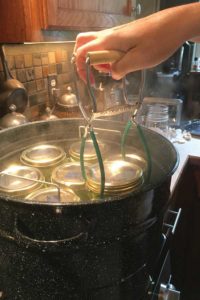 Place filled jars on metal rack in the water-bath canner (Lolio’s held seven jars) and lower the rack into the water. Cover tightly with the canner lid. Boil for at least 15 minutes, or according to recipe directions.
Step 10: Cool Jars
 Raise the rack out of the water and use the Jar Lifter to get jars off the rack; set aside to cool. As they cool, the heat sucks the lid down to finish sealing it; you should hear a satisfying “click” from the button in the middle within the first hour or so of cooling time. When cool, mark the jars with the date and move them to a cool, dark, dry place.
Step 11: Enjoy